Proper soldering is essential for ensuring reliable electrical connections in various applications, from electronics to automotive wiring. High-quality solder joints provide excellent conductivity, mechanical strength, and long-term durability. Among the materials used in soldering, Tin Coated Copper Wire and Tinned Copper Wire stand out for their superior performance.
Tin Coated Copper Wire involves coating a copper wire with a thin layer of tin, enhancing its resistance to corrosion and oxidation. This coating ensures that the wire remains conductive and maintains its integrity over time, even in harsh environments. Similarly, Tinned Copper Wire, which is essentially the same, offers the same benefits of enhanced durability and ease of soldering due to the tin coating.
This blog aims to guide you through the process of soldering tin coated copper wire, ensuring you achieve strong, reliable joints every time. We will cover the necessary tools, preparation steps, and techniques to help you master this essential skill. Whether you’re a hobbyist or a professional, understanding how to properly solder tin coated copper wire will improve the quality and longevity of your electrical connections.
Preparing the Materials
To ensure a successful soldering project, proper preparation of materials is crucial. Here’s a list of the essential tools and materials you’ll need: Tin Coated Copper Wire or Tinned Copper Wire, a high-quality soldering iron, solder (preferably rosin-core), flux, wire cutters, a wire stripper, a heat-resistant mat, and safety goggles.
Choosing the right solder and flux is vital for achieving strong, reliable joints. For Tin Coated Copper Wire and Tinned Copper Wire, rosin-core solder is ideal because it contains flux within the solder, simplifying the process. Flux is essential as it cleans the metal surfaces, ensuring a good bond by removing oxidation and promoting the flow of solder. Acid-based flux should be avoided as it can cause corrosion over time.
Preparing your workspace is also key to safe and efficient soldering. Work on a heat-resistant mat to protect your surface and provide a stable area for your tools. Ensure proper ventilation to avoid inhaling fumes, and wear safety goggles to protect your eyes from solder splashes. Keep your tools organized and within reach, and ensure you have a stable power source for your soldering iron. With these preparations, you’ll be ready to solder Tin Coated Copper Wire effectively and safely.
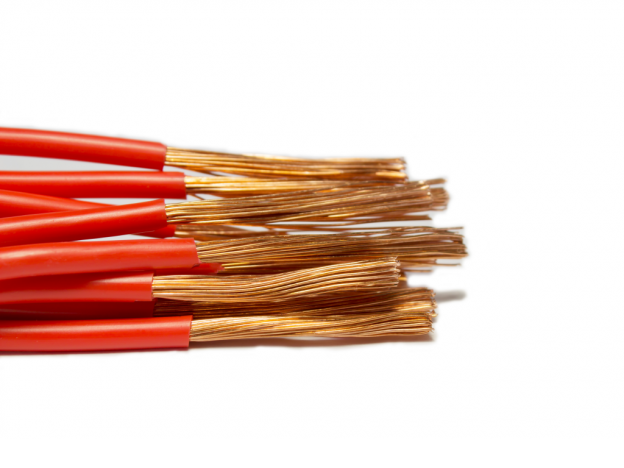
Preparing the Wire
Properly preparing the wire is essential for a strong solder joint. Here’s a step-by-step guide on how to prepare Tin Coated Copper Wire and Tinned Copper Wire for soldering:
- Stripping the Wire: Use a wire stripper to remove about 1/4 to 1/2 inch of the insulation from the end of the Tin Coated Copper Wire. Be careful not to nick the wire strands, as this can weaken the wire and lead to breakage.
- Cleaning the Wire: Even though Tin Coated Copper Wire and Tinned Copper Wire are resistant to oxidation, it’s still crucial to ensure a clean surface. Use a small brush or cloth with isopropyl alcohol to remove any dirt, grease, or oxidation from the exposed wire. This step ensures the solder adheres properly.
- Tinning the Wire: Before soldering, tinning the wire can significantly improve the soldering process. To do this, heat your soldering iron and apply a small amount of rosin-core solder to the tip. Then, touch the soldering iron to the stripped end of the Tin Coated Copper Wire. As the wire heats up, apply solder to the wire, allowing it to flow and coat the strands evenly. This step ensures a good connection and makes the soldering process easier.
By following these steps, you ensure that your Tin Coated Copper Wire and Tinned Copper Wire are perfectly prepared for soldering, leading to strong, reliable connections.
Soldering Process
Soldering Tin Coated Copper Wire and Tinned Copper Wire requires precision and the right techniques. Here are detailed steps to achieve a strong, reliable connection:
- Heat the Joint: Turn on your soldering iron and let it reach the appropriate temperature (around 350°C or 662°F for most soldering jobs). Place the tip of the soldering iron against both the Tin Coated Copper Wire and the surface you’re soldering it to. This ensures both components are heated evenly.
- Apply the Solder: Once the wire and the surface are heated, apply the solder to the joint, not directly to the soldering iron. The solder should melt and flow into the joint, covering the wire and the connection point. For Tinned Copper Wire, this process will be smoother as the pre-tinned wire easily accepts the solder.
- Remove the Heat: After applying enough solder to form a good joint, remove the soldering iron and allow the joint to cool naturally. Do not move the wire or the joint while it’s cooling, as this can create a weak, brittle connection.
- Inspect the Joint: A properly soldered joint should be shiny and smooth. If it’s dull or grainy, it indicates a cold joint, which is weak and unreliable.
Common mistakes to avoid include using too much solder, which can cause bridging between connections, and insufficient heating, leading to cold joints. Ensuring the wire and the surface are clean and adequately tinned before soldering will help you achieve a strong, reliable connection every time with Tin Coated Copper Wire and Tinned Copper Wire.
Post-Soldering Steps
After completing the soldering process for Tin Coated Copper Wire and Tinned Copper Wire, it’s essential to follow some post-soldering steps to ensure the quality and reliability of your connection.
- Inspect the Soldered Joint: Look closely at the soldered connection. A high-quality joint should appear shiny, smooth, and conical in shape, indicating good heat distribution and proper solder flow. If the joint looks dull, grainy, or has a ball-like appearance, it may be a cold joint, which is weak and unreliable. Reheat and apply more solder if necessary to achieve the desired look.
- Clean the Joint: Residual flux can cause corrosion over time, so cleaning the soldered joint is crucial. Use a small brush or cloth with isopropyl alcohol to remove any flux residue around the connection. This step helps maintain the integrity of the joint and prevents potential long-term issues.
- Test the Connection: To ensure the soldered joint is both electrically and mechanically sound, perform a continuity test using a multimeter. Place the multimeter probes on either side of the joint to check for electrical continuity. The reading should show a low resistance, indicating a good connection. Additionally, gently tug on the wire to test its mechanical strength; the wire should remain firmly in place.
By inspecting, cleaning, and testing your soldered Tin Coated Copper Wire and Tinned Copper Wire connections, you ensure their reliability and durability, leading to a successful and long-lasting electrical project.
Final Thoughts
Soldering Tin Coated Copper Wire is a crucial skill that ensures strong, reliable electrical connections. Recapping the key steps, the process begins with gathering the necessary tools and materials, including a soldering iron, solder, flux, wire cutters, and safety equipment. Properly preparing the workspace and choosing the right solder and flux are essential for successful soldering.
Next, preparing the wire involves stripping and cleaning the Tinned Copper Wire to ensure a clean, oxidation-free surface. Tinning the wire before soldering helps achieve a smooth and strong connection. The actual soldering process involves heating the joint, applying solder to the heated wire and connection point, and allowing it to cool naturally without movement.
Post-soldering steps are equally important. Inspecting the joint for a shiny, smooth appearance, cleaning off residual flux with isopropyl alcohol, and testing for electrical continuity and mechanical strength ensure the reliability of the connection.
Proper preparation and technique are vital throughout the process. With practice and attention to detail, you can master soldering Tinned Copper Wire, leading to optimal results in your projects. Keep refining your skills to achieve consistently strong and dependable connections.